Wednesday, February 24, 2016

Let's Make a Trade


     We started our trade fair story by having a guest speaker named Travis Childs come in and visit our classroom. Travis Childs is from The History Museum in South Bend. He talked to us about this area's history, especially when it came to trading. He brought us some fur pelts to show us different animals that were traded. It was very interesting to learn so much about South Bend's history. The History Museum is a great place for a school field trip. To learn more about field trips to The History Museum, click here

     After Travis Child's presentation, we got to have our own trade fair in class. Before class, Syd told us to bring with us at least one item that we wanted to trade in our trade fur. She said it could be food, homemade items, or garage sale items. When she first said this, I was not sure what I wanted to bring. I ended up bringing a child's book called Riding Dinos with Buck Bronco. I figured that since we are all teachers we can always use more children's books.

     When it came time for the trade fair to actually start, we all put our items on our desks. We walked around the classroom and looked around at everyone's items. I looked at everyone's items and had absolutely no idea of what I wanted to trade my book for. So, I decided to wait around and see who came to me and wanted to trade for my book. Alyssia asked me if we could trade, and I happily accepted. I traded my book for a Reader's Theater Big Book.


     After the trade fair, I reflected on my trade items. I am happy that I ended up with a big book, but at the same time I was a little disappointed. I really wanted Maria's watercolor painting or Laura's coasters, but I felt that my book wasn't good enough for either of these items. Now I am left to wonder what would have happened if I would have just asked either lady to trade with me. However, I did like my reader's theater book that I ended up with. 

     I think that in a future classroom, this would be a great way to teach economics. We talked about so many different aspects of economics just through our classroom trade fair. I think that it also is an exciting way to teach economics. However, I realize that not all of my students would have the ability to bring in items from home. With that in mind, I would have to either bring in items that students could choose from or spend a day making crafts to trade. I think that this is easily accomplishable though. It would be a fun and exciting way to teach a classroom economics. 


Social Studies Blog Post #3


Sunday, February 21, 2016

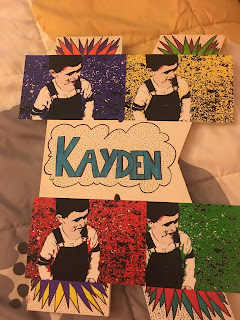
Pop Of Kayden

      My final art piece was pop art. When I think of pop art, bright colors and comic books come to my mind. I also think of the photo booth application on my MacBook where one of the effects is Pop Art. This effect splits the screen up into four sections, each with three different colors. It is the same picture but just different colors. This became my inspiration for my final piece of art.   


I took a photo that I took of Kayden and used a photo editing application to apply a pop art effect to the images. I sent those to the store to be printed. I chose to use the letter K since my nephew’s name is Kayden. I figured that this would be something he could hang in his bedroom. Once I got my photos and my canvas letter K, it was time to start designing.

I decided that since my photo booth application’s Pop Art effect was four images perfectly straight that I wanted Kayden’s photos to be straight on the K. I laid them on the K, and when I was happy, I glued them down.  


From here I decided that I wanted to write his name in the center. I chose to write it in bubble letters because when I think of pop art, comic books come to my mind. I chose to write his name like comic books would write BANG or BAM or something like that. I decided to draw a cloud around it because comic books tend to do things like that. From there I decided to draw weird spike things coming from each picture. I think again that this idea came from comic books. I chose to use sharpies because I thought they would color nicely and were very vibrant like pop art. I added a bunch of dots in the background to give it a little bit more of a pop because pop art is not plain. Once I was done drawing with my Sharpies, I trimmed my photos and used Modge Podge to seal my entire piece of art.

Overall, I am extremely happy with my project. At first I was just going to take Kayden’s photos and make them larger and just glue them down on the K, but I am really glad that I didn’t. I think that by drawing it myself, it made it more personal. Plus I think it is much more exciting like this than it would have been if I only had photos. When I put the Modge Podge on, it started smearing the Sharpies, and I was a little bit upset because the background was no longer perfectly white like I wanted. However, after looking at it some more, I am really glad that the Sharpie smeared. I think it gave the K a little more pizazz. I cannot wait to give it to him to see if he likes it as much as I do.


"Speed Drawing of Batman" - Jasmina Suzak


References:
https://couchsurfhero.files.wordpress.com/2015/04/pow2.png 


Art Blog Post #4

Monday, February 8, 2016

Let Your Dreams Take Flight


 "Every child is an artist. The problem is how to remain an artist once we grow up."
-Pablo Picasso


My third week of visual arts projects, I chose Found Art. I wasn't really sure what found art was, so I started this project by Googling found art. What I learned was that found art is art created from objects that you find and usually isn't considered to be art. I decided I wanted to use a bucket of buttons I had to create something beautiful.

I decided I wanted to create a hot air balloon and incorporate the quote "Let your dreams take flight." I took a painted burlap canvas and dumped out my bucket of buttons on the ground. I started grabbing buttons to create the outline of the hot air balloon. Once I was happy with the way the outline was, I hot glued down all of the buttons. From there I started adding more buttons to fill in the space. Once my hot air balloon was done, I had to figure out how I was going to create my basket. I knew I wanted to use string to weave the basket, but I had no idea on what to use to hold the string. I found some push pins in my drawer and decided to try those out. I stuck all the pins in and decided that they were perfect! I flipped the canvas over, cut down the tips of the push pins, and added hot glue around them. I didn't want the push pins to accidentally poke me, so I made sure the ends of the push pins were coated with hot glue. This made them much less pointy. Once I was done with the push pins, I grabbed some orange string and started wrapping it around the push pins until I was happy with the way it looked. I then took my pencil and wrote out "Let your dreams take flight" onto the canvas. I took a light blue and a green paint and mixed the two colors together to create a turquoise kind of color. I used this color to paint the quote onto the canvas.

Overall, I am very happy with my art project! I think it turned out much better than I thought it was originally going to. I absolutely love the buttons that I chose to use on the hot air balloon. Originally, I was going to use buttons that were completely flat, but I saw that some of the coolest buttons I had were not flat. I knew that I had to have those on my hot air balloon, so I made them worked. I am glad that I did. I think the unique buttons helped give my hot air balloon more character. 


"I Found Art" by Lillian Peel


Art Blog Post #3

Let's Build a Community


In our Social Studies class, we were told we were going to create our own community. It was going to be up to us a class to decide what we wanted in our community. Once everything would be built, we would have to decide how to lay out our town. Syd told us there would be a problem, but little did we know that this problem would be as serious as it turned out to be. We also were not aware that this problem was the key component of our project.
Excitedly, we went to work creating our community. We started a discussion forum where everyone was able to put down what building they wanted to create to add to the town. A school, post office, church, and Starbucks were a few of the wonderful contributions that came to our town. I decided that I wanted to make a Hacienda. While a hacienda might not be "necessary" to others, I thought that our town needed one.  Hacienda is my favorite restaurant, so if I was going to be living in this community there had to be a hacienda. Everyone worked hard to create their buildings for the town. Once everyone built their house and one building for the community, we then had to work together to organize our town. We started out by taking large rolls of paper and laying out how large wanted our town to be. Once we agreed on that, we started placing our buildings where we wanted. Luckily, we were all on the same page when it came to laying out our town. We decided that we wanted all of our houses to be on the same side of the town. We chose to put our police station, hospital, fire station, and post office all on the same side of town. We also chose to place our school, daycare, and library on the same block. Roads were build and a parking lot was created to make our town more functional. Finally, we had to agree on a town name, "Dragonfly" and a town motto, "Live Creatively!"


While working on this project, I don't think anyone thought about the problem that was within our town, even though we were told there would be one. I think that we all forgot about the problem because we were so excited to create our buildings. Once we were reminded that there was a pollution problem in our community, we had to work together to determine how we were going to solve this pollution problem. Luckily, we were able to work together and come up with a solution.

I think that this project would work very well in a classroom at the beginning of the school year. It would teach our students how to collaborate and create a connectedness between students. I think that this project would teach our students how to solve a problem if one is to arise in our classroom community, like it did in our town. This project would help teach our students civics and how  everyone has an opinion. Even though we might not necessarily agree with someone's opinion, it is important to understand and respect that opinion. When it came to us deciding what we were going to build, we each had an opinion on what we thought was important for our town. Not once did someone put down someone's building because they didn't agree that it was important enough to be in our town. This would be beneficial in a classroom to teach students to respect each other's opinion.

I definitely am able to see how important it is to create a community, like we did in Dragonfly, within our classroom.

To learn more about building a community in the classroom check out the video: Building Community in the Classroom


Social Studies Blog Post #2

Sunday, February 7, 2016

Explosion


      For my second visual arts project, I chose to abstract art. In the beginning, I was very unsure of what I wanted to do. I knew that abstract art was vague and could be whatever I wanted it to be. It was going to have some deeper meaning to it, but I didn't know where to start. I had a blank canvas, literally, and needed to create something abstract on it. I stared at my canvas for awhile before remembering that I use to take crayons and hot glue them onto canvas and then melt the crayons. Since I have done that before, I decided to try something else. However, I still wanted to use melted crayons.
      I started by choosing what colors I wanted from then piles of crayon boxes I had. I chose pinks, purples, and blues because I thought that they would mix well together. I originally was going to do all of the colors of the rainbow, but I was concerned that once the colors started blending I would get a really ugly color. After choosing my colors, I peeled the paper off the crayons by soaking them in warm soapy water for a few minutes. I then broke the crayons in half and created a pile of broken crayons. I grabbed my blower dryer, a fork, and a magenta crayon piece. I used the fork to hold the crayon on the canvas while I used the blow dryer to melt the magenta crayon. After splattering enough magenta for my liking, I grabbed purple crayon and melted that. I continued this process with several other broken crayon pieces. I noticed that while I was melting a specific crayon, some of the melted crayon on the canvas was reheating and starting to spread into other colors. I used this to my advantage and used my blow dryer to direct the melting crayons to certain spots in order to mix various colors. I continued doing this until I was happy with how it turned out.

      Overal, I think that my abstract piece turned out wonderful! I am very happy with the way that it looks. One thing I might end up doing with it is melting the crayons more so that there is no more white canvas in the background. Once it is completely covered, i would want to paint some kind of quote onto it. However, after spending about forty-five minutes melting crayons, I was burnt-out. I am extremely happy with how it turned out!

References:
https://s-media-cache-ak0.pinimg.com/236x/08/e0/18/08e018fbe8ec28bc080bc925e4f74a81.jpg

Art Blog Post #2